Using a public EV charger for the first time can feel more complicated than it should. For many drivers, the challenge is not just finding a charger. It is knowing exactly what to do when they arrive, which connector to choose, how to pay, and how to make sure the session starts properly.
That is exactly why the ONEEV app is designed to make charging easier.
Whether you are completely new to public charging or you simply want a more straightforward way to charge on the go, this guide will walk you through the full process in a calm, easy-to-follow way. From finding a charger to starting your session, here is how to charge your electric vehicle using the ONEEV app with confidence.
Why using the right charging steps matters
Public EV charging should be simple, but if you are standing at a charge point for the first time, it is easy to feel unsure. Some locations have multiple chargers, some require you to use your own cable, and some charge points can be difficult to identify if the numbering is small or unclear.
The good news is that once you understand the process, charging with the ONEEV app becomes much easier. A few simple checks before and during your visit can help you avoid confusion and get your session started smoothly.
Before you start charging with the ONEEV app
Before heading to a charging location, make sure you have already downloaded the ONEEV app and added your preferred payment method.
It is also worth checking that your phone has enough battery and that you have a mobile signal or internet connection, as this will help the app load the charger information when you arrive.
Once that is done, you are ready to begin.
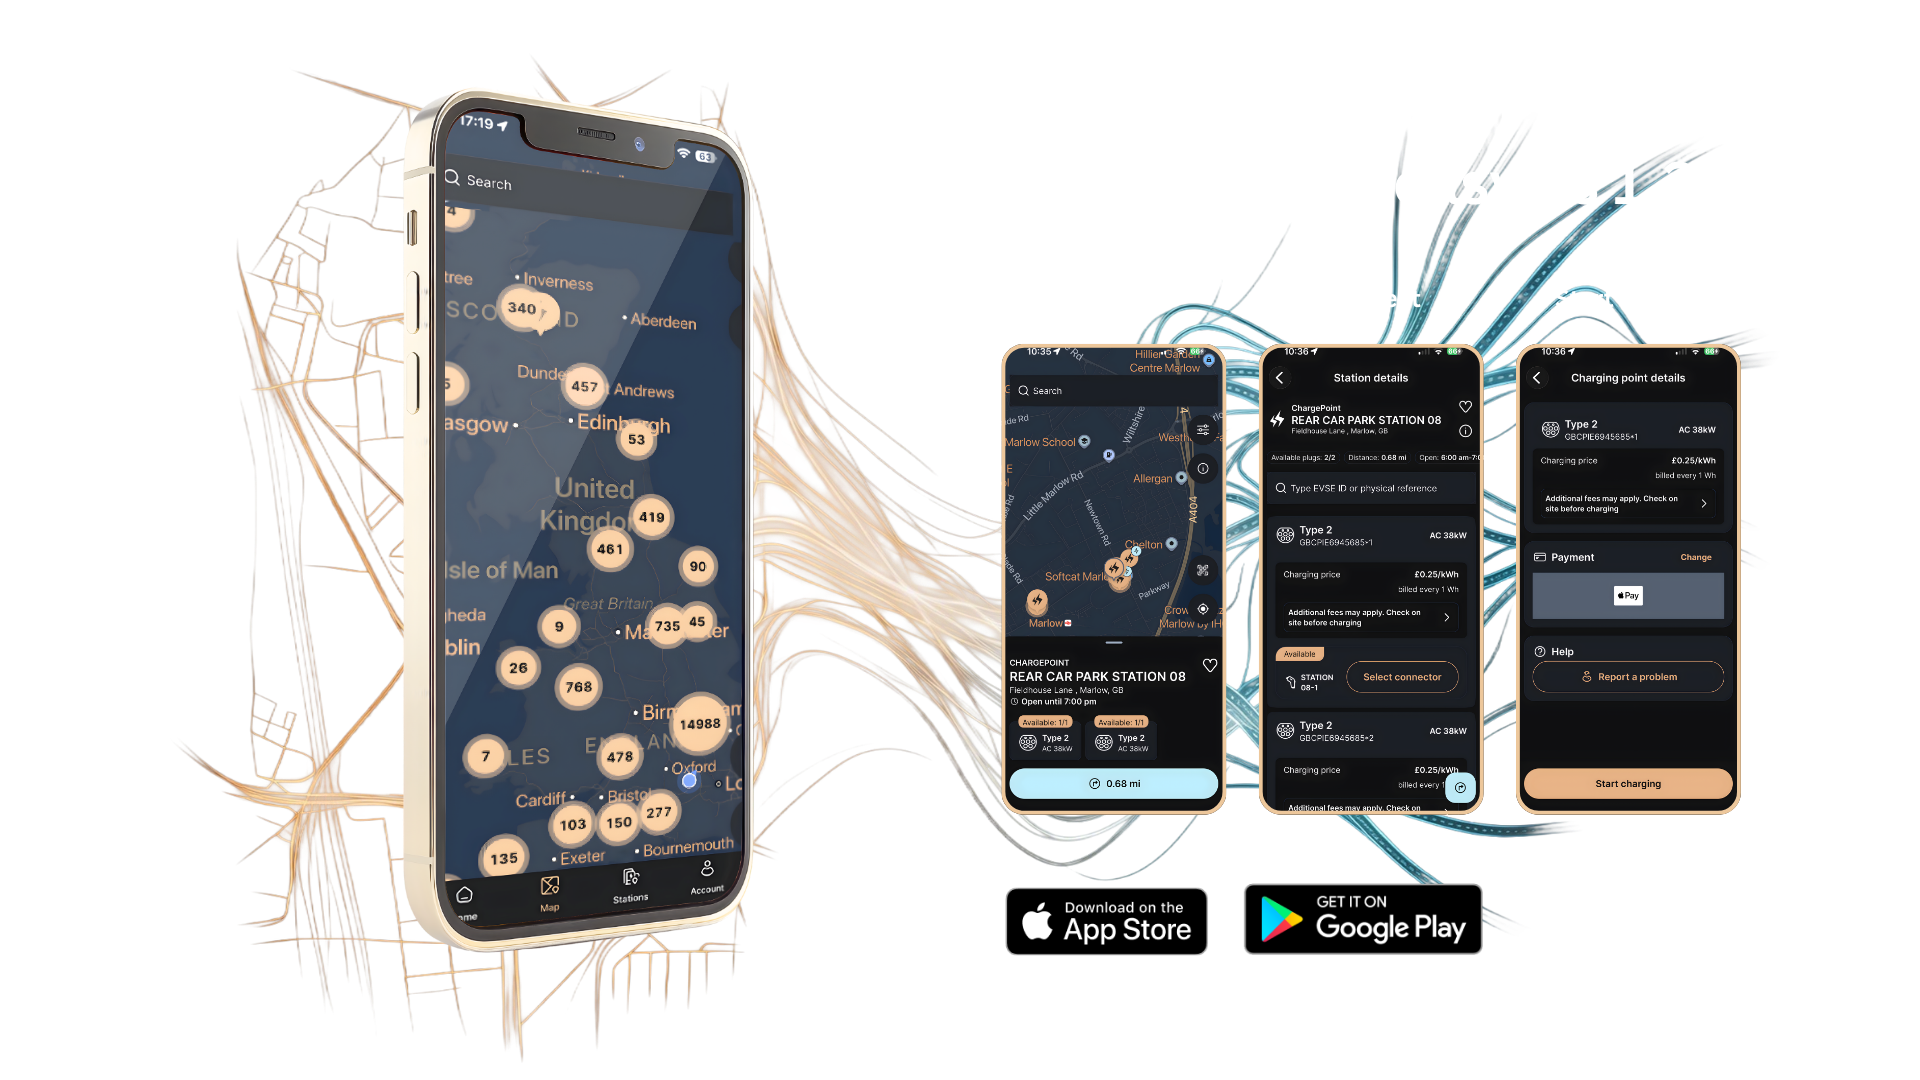
Step 1: Find an EV charging location in the ONEEV app
Open the ONEEV app and go to the map view. You will see available charging locations displayed as pins on the map.
Step 1: Find an EV charging location in the ONEEV app
Open the ONEEV app and go to the map view. You will see available charging locations displayed as pins on the map.
Tap on the charger you would like to use. This will open the full charger details so you can review the location before you travel.
Before setting off, always check that the charger shows as Available. If it is currently in use or unavailable, simply choose another nearby charger that is ready to use.
This small check can save you time and help you avoid arriving at a charger that is not ready for your session.
Step 2: Use the app to navigate to the charger
If you are not sure where the charge point is, tap the navigation symbol in the bottom right-hand corner of the screen. This will help guide you to the charger location.
This is especially useful if the charger is in a larger car park, retail site, or service area where the exact unit may not be immediately obvious.
Using the in-app route guidance helps make the journey to the charger easier and more convenient.
Step 3: Confirm the correct charging location when you arrive
Once you arrive at the site, open the ONEEV app again and go back to the map view.
Select the charging location you are standing at and open the station details. This helps confirm that you are at the correct place before starting the charging session.
This is an important part of the process, particularly at locations with more than one charger.
Step 4: Check the charger number carefully
Some EV charging sites have multiple units close together, so it is important to make sure you are choosing the correct charge point in the app.
Take a moment to check the charger number on the unit. In some cases, the number may be small, slightly worn, or not easy to spot at first glance. If there are several chargers nearby, matching the number on the charge point with the one shown in the app will help ensure you start the correct session.
There is no need to rush this part. Taking a few extra seconds here can make the rest of the process much smoother.
Step 5: Select the correct connector for your vehicle
Once you have opened the station details, choose the connector you want to use.
Some chargers have more than one connector option, so selecting the correct one is essential. The app needs to know exactly which connector is linked to your vehicle before the session can begin.
If you are unsure which connector your car uses, it is worth checking your vehicle type and cable setup in advance so you feel more confident at the charger.
Step 6: Choose your preferred payment method
After selecting the connector, the ONEEV app will ask you to choose your payment method.
Select the card or payment option you want to use, then continue to the next screen. You may also be asked to authorise the card before the session begins. This is a normal part of the process and allows charging to start securely.
Once approved, you are ready to connect your vehicle.
Step 7: Plug your EV into the charger
Now connect the charger to your car.
If the charger is tethered, the cable will already be attached to the charge point. In this case, simply plug the charger cable into your vehicle.
If the charger is untethered, you will need to use your own charging cable. Connect one end to the charge point and the other end to your car.
After everything is connected properly, you should see a battery symbol on the screen to show that the vehicle connection has been recognised.
Step 8: Start your EV charging session
Once your vehicle is connected and your payment method has been authorised, press Start Charging in the ONEEV app.
The charging session should then begin.
In some cases, it may take a few moments for the charger and the vehicle to communicate with each other. That is normal, so allow a short moment for the process to complete.
Once charging has started, you should be able to view the session progress in the app.
A simple summary of how to charge using the ONEEV app
If you want the process in its simplest form, it works like this.
- Open the ONEEV app and find a charger on the map.
- Check that the charger is available.
- Use the navigation feature if needed.
- Arrive at the location and open the station details.
- Check the charger number carefully.
- Select the correct connector.
- Choose your payment method.
- Authorise the card if prompted.
- Plug your vehicle into the charger.
- Press start charging.
- Wait for confirmation that the session has begun.
What to do if you feel unsure at the charger
If you ever arrive at a charger and feel unsure about what to do next, the best approach is to slow everything down and go step by step.
First, confirm you are at the right location.
Next, check the charger number.
Then choose the correct connector.
After that, select your payment method, connect the vehicle, and start the session.
Public charging often feels much easier when you treat it as a simple sequence rather than trying to do everything at once.
Helpful tips to make EV charging easier
A little preparation can make a big difference to your charging experience.
- Review the charger details before you travel, especially if you are visiting a new location.
- If the site has multiple chargers, take a moment to check the unit number carefully before selecting it in the app.
- If the charger is untethered, make sure you have your own cable with you.
- If the charging session does not begin immediately, allow a short pause while the charger and car complete their connection.
These small steps can help make charging feel more predictable and far less stressful.
Charging your EV with confidence
Using the ONEEV app to charge your car is designed to be simple, clear, and convenient. Once you have completed the process once or twice, it usually becomes much more familiar and comfortable.
Many drivers feel unsure the first time they use public charging, particularly if they are using an app-based system for the first time. That is completely normal. The key is to take it one step at a time and let the app guide you through the process.
With the right charger, the right connector, and a clear payment flow, you can get on with charging your EV with greater confidence wherever you go.

